
Nowadays we store a lot of digital data including home-media, music and movies. It would be nice to store it at a single place and access it from any computer in the home. A file server or Network Attached Storage (NAS) is great for this as well as for automatically backing up other important data from computers in the home.
Hardware
- Raspberry Pi
- power supply
- micro SD card
- Raspberry Pi case
- USB Hard disk
- for initial setup, it would be nice to have
- Keyboard and Mouse
- Monitor
Software
- Raspberry Pi OS
- OpenMediaVault
Any Raspberry Pi is good for this project but I wanted something that has the best network and USB I/O performance, so I settled on Raspberry Pi 4 8GB version.
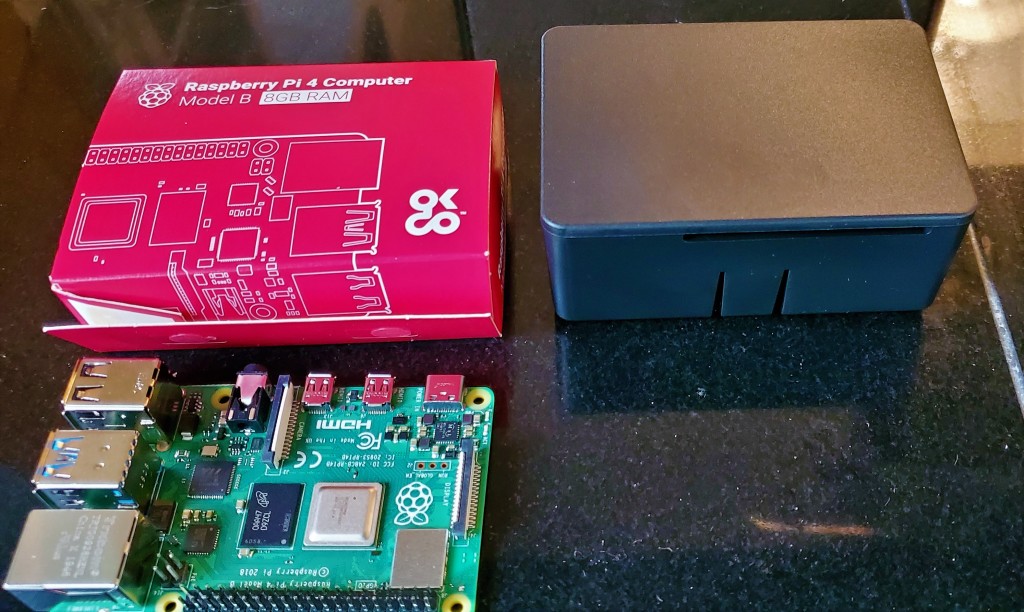
The HighPi case is high enough that it allows to install heatsinks and has good enough air flow. I bought both of these as part of a Raspberry Pi kit.


The USB hard disk was from an online deal.

Initial Setup
For the initial setup, connect a USB keyboard and mouse and a monitor (using HDMI cable) to the Raspberry Pi. On a computer download Raspberry Pi OS and install the image on a micro SD card.
Installing Raspberry Pi OS on a micro SD card
After SD card is ready, insert it into Raspberry Pi board and switch the power on. Follow the instructions on the screen to complete Raspberry Pi OS installation. After the installation you should see Raspberry Pi desktop.

Make sure that your network is working (connect the Ethernet cable if using a wired connection or using icons on top right connect to your WiFi network).
Connect the USB hard disk and verify that it is visible in the file manager app.
Also, using the menu “Preferences->Raspberry Pi Configuration” enable SSH to be able to login to Raspberry Pi remotely from other computers.

A note about 64bit OS
You can (and should) run 64bit OS on Raspberry Pi 4 but when I was working on this project there were very limited number of options available and I did not have much time to explore each of these in-depth but even then I tried the following briefly
- Manjaro
- It is fast and clean but I did not know how to quickly install OpenMediaVault on it so I did not use it.
- Ubuntu server 64bit
- You need to first install the server image and then install Desktop using the usual command line tools. I did not use it as configuring Wifi using command line before you could install anything else was not-so-straight-forward.
- Raspberry Pi OS 64bit
- Previously known as Raspbian, this has a 64bit version that works on Raspberry Pi 4 and it was easy to install.
Install OpenMediaVault
OpenMediaVault (OMV) is the next generation network attached storage (NAS) solution based on Debian Linux. It contains services like SSH, (S)FTP, SMB/CIFS, DAAP media server, RSync, BitTorrent client and many more.
OMV can be installed as an ISO image that includes full operating system but we’ll install it here as a package on top of our Raspberry Pi OS.
First, upgrade the OS itself
apt-get update
apt-get upgrade
Then add the package repositories
cat <<EOF >> /etc/apt/sources.list.d/openmediavault.list
deb https://packages.openmediavault.org/public usul main
# deb https://downloads.sourceforge.net/project/openmediavault/packages usul main
## Uncomment the following line to add software from the proposed repository.
# deb https://packages.openmediavault.org/public usul-proposed main
# deb https://downloads.sourceforge.net/project/openmediavault/packages usul-proposed main
## This software is not part of OpenMediaVault, but is offered by third-party
## developers as a service to OpenMediaVault users.
# deb https://packages.openmediavault.org/public usul partner
# deb https://downloads.sourceforge.net/project/openmediavault/packages usul partner
EOF
install OMV package
export LANG=C.UTF-8
export DEBIAN_FRONTEND=noninteractive
export APT_LISTCHANGES_FRONTEND=none
wget -O "/etc/apt/trusted.gpg.d/openmediavault-archive-keyring.asc" https://packages.openmediavault.org/public/archive.key
apt-key add "/etc/apt/trusted.gpg.d/openmediavault-archive-keyring.asc"
apt-get update
apt-get --yes --auto-remove --show-upgraded \
    --allow-downgrades --allow-change-held-packages \
    --no-install-recommends \
    --option Dpkg::Options::="--force-confdef" \
    --option DPkg::Options::="--force-confold" \
    install openmediavault-keyring openmediavault
And finally, populate OMV database
omv-confdbadm populate
This should install OMV on top of the Raspberry Pi OS but if interested, more information can be found here.
After the installation, OMV is available via a web interface. On the Raspberry Pi itself, open a web browser and go to the url http://localhost and you should see OMV login page.
You should be able to connect to the same web interface from a different computer. If for example, Rapberry Pi’s ip address is 192.168.1.5 and hostname is “mediavault“, open a web browser on the computer and go to the url http://192.168.1.5 or http://mediavault.local. You should see the same OMV login page.

The default web interface login credential is
Username: admin
Password: openmediavault

# Don't forget to change it when you login for the first time
If this works, you can always access your NAS from a remote computer as long as it is connected to the home network, so you don’t need it connected to a monitor, keyboard and a mouse anymore.
Actually you could even configure Raspberry Pi to boot to the “command line” mode instead of “Desktop” mode so that you don’t run the programs not needed anymore. To do this, connect to your Raspberry Pi through SSH from a computer and run the following command after logging in
sudo raspi-config
Select the following items in menu:
- Boot Options
Desktop CLI/Console Autologin To login to console with automatic login as pi user
After the reboot, you should still be able to connect to OMV web interface. The OMV dashboard looks something like this and allows to configure almost anything on NAS from the web interface itself.

Configuring Storage
After configuring general settings according to your liking the first thing a file server / NAS needs is storage. In my case, I connected the external hard disk to the Raspberry Pi via USB and powered it on. It appeared in OMV Disks menu.

I enabled “Intermediate power usage with standby” from Disks menu for my hard disk and S.M.A.R.T. monitoring from S.M.A.R.T. menu.
You also need to create a filesystem on the disk if it doesn’t already have one (My Hard disk came with a filesystem but I changed it to an “ext4” filesystem because I like it).

Sharing Files from NAS
Create share
Now that your disk is ready with a filesystem, you need to create a shared folder using Shared Folders menu. Add a share and select your hard disk as the device, give the share a name and a path on the hard disk.

Enable File Sharing
One of the easiest ways to share file between a file server / NAS and a computer is to enable a SMB/CIFS share. It can be done using SMB/CIFS menu in OMV.
First enable the SMB/CIFS service

and then select what to share (you can share the Shared Folder created in the previous step)

Accessing Files shared from NAS on other computers
On a computer with Windows operating system, the shared folder from NAS can be accessed easily if we map it as a network drive. When successful, the files from the shared folder on NAS can be browsed just like files on a local disk of the Windows computer.
To do this, open “File Explorer” application on Windows and right-click on the “Network” item from the list on the left and select “Map network drive...” from the menu

In the dialog box enter the path of the shared folder from the NAS (for example, if the NAS name is “mediavault” and the shared folder name is “DATA“, the path is “\\mediavault\DATA“)

Press the finish button and the files from the shared folder from NAS should be available in the drive “Z:” on Windows

This completes the simple Raspberry Pi file sever / NAS setup. The NAS can be controlled easily from any computer with OpenMediaVault’s web interface and shared files are available to Windows computers in the mapped network drive.
You can map the NAS shared folder on multiple Windows computers and enjoy the file sharing among these computers.
Backup data from other computers to NAS
Also, you can backup your important data from your Windows computers to the NAS using Backup application of Windows.

And that’s it! Enjoy your new Raspberry Pi fileserver / NAS.
Bonus: Backup Raspberry Pi OpenMediaVault NAS to a Synology NAS
This is a bit more advance but completely optional topic. While we can use Raspberry Pi OMV NAS to backup the data from the computers in the home, it is also possible to create a secondary backup of all the data on Raspberry Pi OMV NAS on another NAS.
I had an old Synology NAS lying around and used it to automatically backup my data from Raspberry Pi OMV NAS to this Synology NAS in case my Raspberry Pi NAS dies.
We’ll use Rsync between the two NAS. First, as explained here in the Synology documentation, enable rsync on Synology NAS.
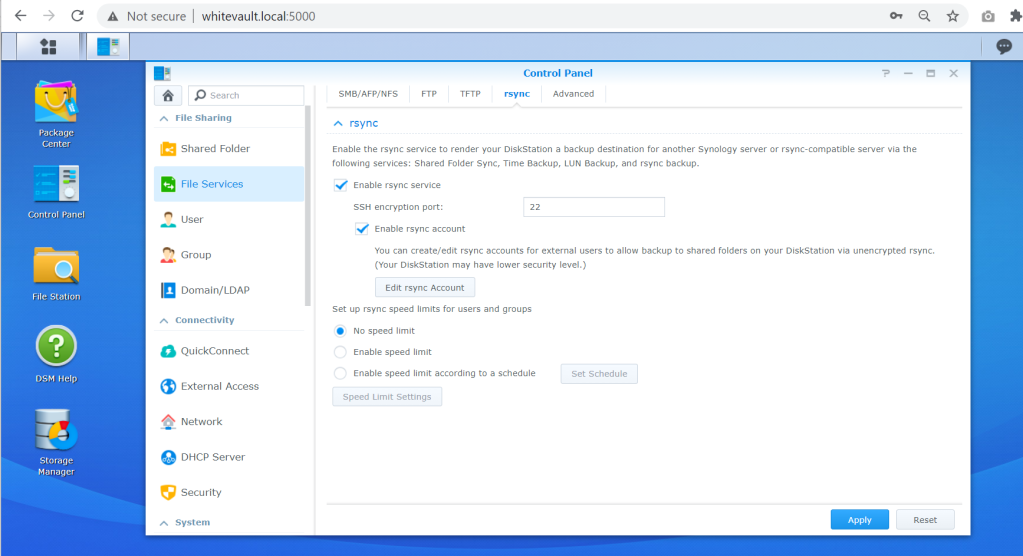
Then setup regular backup from Raspberry Pi OMV NAS to Synology NAS using rsync.

As you can see in the image above, my Raspberry Pi OMV NAS backs up data to my Synology NAS (referred to as whitevault here) every night at 3am.

