
Introduction
In this post, we’re going to talk about converting a Python library to a web API. Why would someone need that? It is common in networking companies to have libraries that interface with network devices (e.g., testbeds), and most of the time these libraries have a CLI interface only. However, like many other companies, networking organizations are also moving parts of their infrastructure to the cloud, making web API conversion a necessity rather than a luxury.
Whether you need to make your library accessible to other teams, integrate with cloud-based platforms, or simply provide a more flexible interface, exposing functionality through a web API is often the solution. Even better, modern tools have made this conversion process remarkably straightforward.
This post demonstrates how surprisingly easy it is to transform a Python library into a fully-documented, OpenAPI-compliant web service using FastAPI and Pydantic. We’ll go from a simple math library with a command-line interface to a containerized web API that can be deployed to Google Cloud Run—all while maintaining clean separation between our core functionality and its interfaces.
What makes this approach special is the automatic generation of API documentation based on the OpenAPI specification. No more manually writing and maintaining API docs that quickly become outdated—your code itself becomes the source of truth for your documentation.
Starting Point: The Python Library
Let’s start with a simple math library that provides basic arithmetic operations. We’ve organized our project with a clear separation between the library code and its command-line interface.
Our project structure looks like this:
project_root/
├── my_lib/                  # Core library package
│   ├── __init__.py
│   └── functions.py         # Mathematical functions
└── cli/                     # Command-line interface
    ├── __init__.py
    ├── main.py              # CLI implementation
    └── requirements.txt     # CLI dependencies
The library code in my_lib/functions.py is straightforward:
# my_lib/functions.py
def add(x: float, y: float) -> float:
    """Adds two numbers."""
    if not isinstance(x, (int, float)) or not isinstance(y, (int, float)):
        raise TypeError("Both inputs must be numbers")
    return x + y

def subtract(x: float, y: float) -> float:
    """Subtracts the second number from the first."""
    if not isinstance(x, (int, float)) or not isinstance(y, (int, float)):
        raise TypeError("Both inputs must be numbers")
    return x - y
We expose these functions in the package’s __init__.py:
# my_lib/__init__.py
from .functions import add, subtract
Command-Line Interface
To make the library usable from the command line, we’ve created a CLI wrapper using the popular Click library, which simplifies building command-line tools:
# cli/main.py
import sys
import click
import my_lib

@click.group()
def cli():
    """Math operations CLI."""
    pass

@cli.command()
@click.argument('x', type=float)
@click.argument('y', type=float)
def add(x, y):
    """Add two numbers X and Y."""
    try:
        result = my_lib.add(x, y)
        click.echo(f"Result: {result}")
    except TypeError as e:
        click.echo(f"Error: {e}", err=True)
        sys.exit(1)

@cli.command()
@click.argument('x', type=float)
@click.argument('y', type=float)
def subtract(x, y):
    """Subtract Y from X."""
    try:
        result = my_lib.subtract(x, y)
        click.echo(f"Result: {result}")
    except TypeError as e:
        click.echo(f"Error: {e}", err=True)
        sys.exit(1)

if __name__ == '__main__':
    cli()
Using the CLI is simple:
# Adding two numbers
python -m cli.main add 10 5
# Output: Result: 15.0

# Subtracting two numbers
python -m cli.main subtract 20 7
# Output: Result: 13.0
While this CLI works well for users comfortable with the command line, it’s not accessible to other applications or platforms. That’s where a web API comes in.
Converting to a Web API
To expose our library as a web API, we’ll add a third component to our project structure:
project_root/
├── my_lib/                  # Core library package
│   ├── __init__.py
│   └── functions.py
├── cli/                     # Command-line interface
│   ├── __init__.py
│   ├── main.py
│   └── requirements.txt
└── web/                     # New web service component
    ├── __init__.py
    ├── main.py              # FastAPI application
    ├── models.py            # Pydantic data models
    ├── requirements.txt     # Web dependencies
    └── Dockerfile           # For containerization
This structure maintains clear separation of concerns:
my_lib/contains our core functionalitycli/provides a command-line interfaceweb/exposes an HTTP API
Creating the Web API with FastAPI and Pydantic
FastAPI is a modern, high-performance web framework for building APIs with Python. What makes it particularly powerful is its integration with Pydantic, a data validation library that uses Python type annotations.
First, let’s define our data models using Pydantic in web/models.py:
# web/models.py
from pydantic import BaseModel

class MathInput(BaseModel):
    """Defines the expected structure for the request body."""
    num1: float
    num2: float

class MathOutput(BaseModel):
    """Defines the structure for the response body."""
    operation: str
    num1: float
    num2: float
    result: float
These models define the structure of our API’s request and response data. Pydantic will automatically validate incoming data against these models, ensuring that our API receives the expected types.
Next, let’s implement the FastAPI application in web/main.py:
# web/main.py
from fastapi import FastAPI, HTTPException
from my_lib import add, subtract
from . import models

app = FastAPI(
    title="Simple API Example",
    description="An API wrapper around my library.",
    version="1.0.0",
)

@app.post("/add", response_model=models.MathOutput, tags=["Math Operations"])
async def api_add(payload: models.MathInput):
    """Receives two numbers via POST and uses the library's add function."""

    try:
        result = add(payload.num1, payload.num2)
        return models.MathOutput(
            operation="addition",
            num1=payload.num1,
            num2=payload.num2,
            result=result
        )
    except TypeError as e:
        raise HTTPException(status_code=400, detail=str(e))

@app.post("/subtract", response_model=models.MathOutput, tags=["Math Operations"])
async def api_subtract(payload: models.MathInput):
    """Receives two numbers via POST and uses the library's subtract function."""

    try:
        result = subtract(payload.num1, payload.num2)
        return models.MathOutput(
            operation="subtraction",
            num1=payload.num1,
            num2=payload.num2,
            result=result
        )
    except TypeError as e:
        raise HTTPException(status_code=400, detail=str(e))

@app.get("/", tags=["General"])
async def read_root():
    """Welcome endpoint."""
    return {"message": "Welcome to the Simple API example!"}
Our dependencies are specified in web/requirements.txt:
fastapi
uvicorn[standard]
The Magic of OpenAPI Generation
Here’s where the magic happens: FastAPI automatically generates an OpenAPI specification from our code. It inspects:
- The paths and HTTP methods in our route decorators (
@app.post("/add")) - The type hints and Pydantic models for request and response data
- The docstrings for endpoint descriptions
All this information is used to create a complete OpenAPI specification that documents our API.
To access this documentation, we can start our API with:
uvicorn web.main:app --reloadAnd then visit:
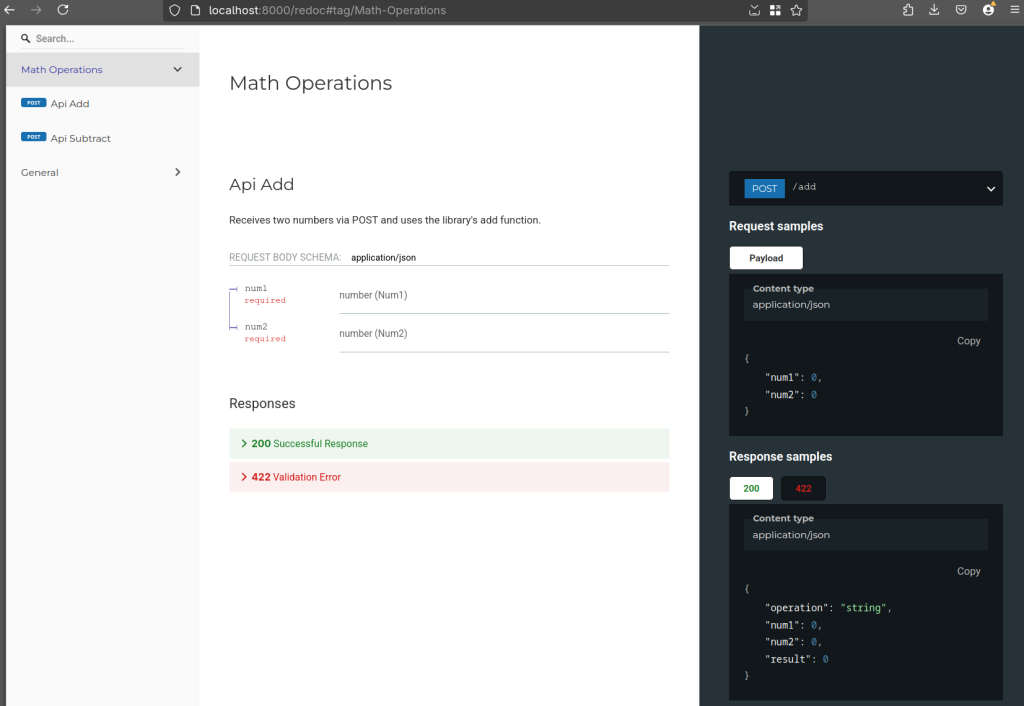
- http://localhost:8000/docs – For the Swagger UI interactive documentation
- http://localhost:8000/redoc – For the ReDoc documentation
- http://localhost:8000/openapi.json – For the raw OpenAPI specification
The /docs endpoint provides interactive documentation where users can:
- Browse available endpoints
- See request and response models
- Try out the API directly in the browser
- View detailed information about parameters and responses
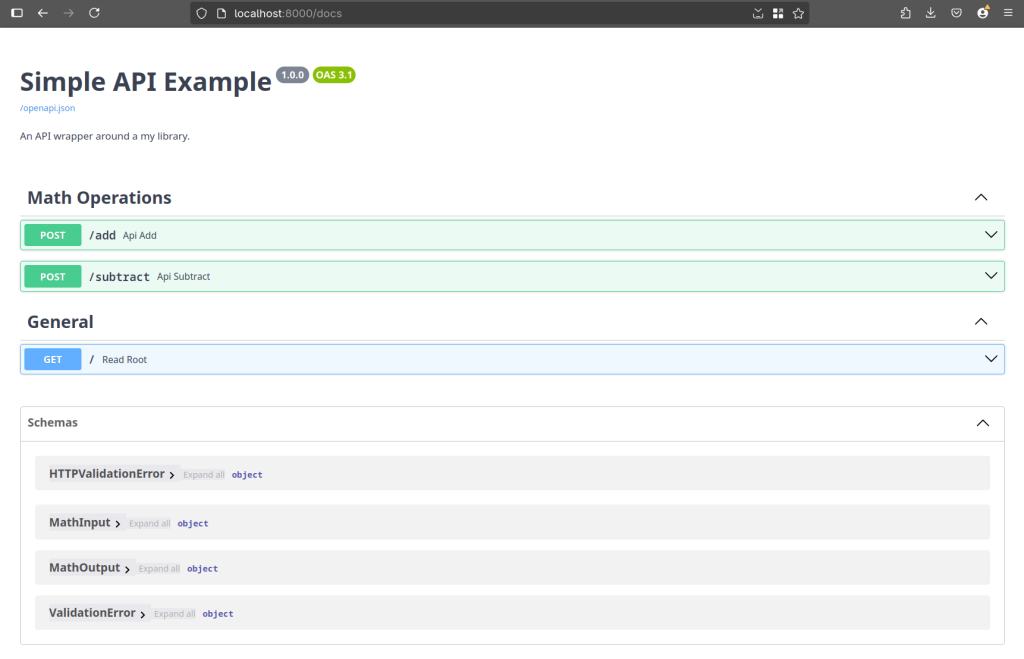
All of this is generated automatically from our code, with no additional configuration required!
Containerizing the API with Docker
To make our API deployable to various environments, we’ll containerize it using Docker. Here’s our web/Dockerfile:
# Use an official Python runtime
FROM python:3.11-slim

# Set working directory
WORKDIR /app

# Copy library and web service code
COPY my_lib/ /app/my_lib/
COPY web/ /app/web/

# Install dependencies
RUN pip install --no-cache-dir --upgrade pip && \
    pip install --no-cache-dir -r /app/web/requirements.txt

# Expose the port the app runs on
EXPOSE 8080

# Command to run the application
CMD ["uvicorn", "web.main:app", "--host", "0.0.0.0", "--port", "8080"]
To build and run the Docker image locally:
# Build the image (run from project root)
docker build -t my-api -f web/Dockerfile .

# Run the container
docker run -p 8000:8080 my-api
Now our API is accessible at http://localhost:8000, including the automatically generated documentation.
Testing the API
Using curl
We can test our API with curl:
# Test the add endpoint
curl -i -X POST \
  http://localhost:8000/add \
  -H 'Content-Type: application/json' \
  -d '{"num1": 10.5, "num2": 5.3}'

# Expected response:
# HTTP/1.1 200 OK
# ...
# {"operation":"addition","num1":10.5,"num2":5.3,"result":15.8}
Using a Web Browser
For a more user-friendly experience, we can explore the API using the Swagger UI at http://localhost:8000/docs:
- Open the browser and navigate to http://localhost:8000/docs
- See a complete list of API endpoints with descriptions
- Expand the
/addendpoint to see details - Click “Try it out”
- Enter values for
num1andnum2 - Click “Execute” to see the API response
This interactive documentation makes it easy for other developers to understand and use our API without having to read separate documentation.
Deploying to Google Cloud Run
With our API containerized, we can deploy it to Google Cloud Run, a fully managed platform for containerized applications:
- Make sure you have the Google Cloud SDK installed and configured
- Build and push the Docker image to Google Container Registry:
# Tag the image for Google Container Registry
docker tag my-api gcr.io/[MY-PROJECT-ID]/my-api

# Push the image
docker push gcr.io/[MY-PROJECT-ID]/my-api- Deploy to Cloud Run:
gcloud run deploy my-api \
  --image gcr.io/[MY-PROJECT-ID]/my-api \
  --platform managed \
  --region us-central1 \
  --allow-unauthenticated
Once deployed, Cloud Run will provide a URL where your API is accessible. The same OpenAPI documentation will be available at /docs on this URL.
Production deployment considerations
The deployment example provided is intentionally simplified for demonstration purposes and is not secure for production environments. For a production deployment, you should implement several additional security measures, including:
– Proper authentication and authorization (consider Firebase Auth, Google IAM, or other identity solutions)
– HTTPS enforcement with proper certificate management
– Environment-specific configuration management (don’t hardcode sensitive values)
– Rate limiting to prevent abuse
– Input sanitization beyond basic type validation
– Logging and monitoring for security events
Conclusion
We’ve transformed a simple Python library into a fully-documented, containerized web API that can be deployed to Google Cloud Run. This journey demonstrates several key advantages:
- Modular Design: We maintained separation between core functionality (
my_lib), command-line interface (cli), and web service (web). - Automatic Documentation: FastAPI and Pydantic automatically generated OpenAPI-compliant documentation directly from our code, eliminating the need to maintain separate API docs.
- Input Validation: Pydantic models ensure that our API receives valid data, enhancing reliability.
- Portability: By containerizing our API with Docker, we made it easily deployable to various environments, including Google Cloud Run.
- Developer Experience: The interactive documentation makes it easy for other developers to understand and use our API.
The combination of FastAPI and Pydantic makes creating well-documented, type-safe APIs remarkably simple. The code itself becomes the source of truth for both implementation and documentation, ensuring they’re always in sync.
Next time you need to expose a Python library as a service, consider this approach. It provides an elegant path from library to API with minimal additional code and maximum benefits.